This cheese ball started as a simple family joke—an absurdly cheesy, gooey mess that somehow became the star of every holiday table. Over the years, I’ve played around with flavors, trying to keep that nostalgic warmth but adding little surprises—like a dash of harissa or smoked paprika—that make it feel fresh, even if it’s just a dip. It’s honest comfort food, the kind that makes everyone lean in for seconds without a word.
There’s something about rolling cheese into a tight ball that feels almost ritualistic—like a secret handshake among cheese lovers. It’s messy and imperfect, but that’s part of the charm. When I serve it at gatherings, I love watching people dip in, eyes lighting up over that first bite of creamy, spicy, slightly tangy goodness. It’s a messy, delicious reminder that sometimes, the simplest ideas are the best.
Focusing on the nostalgic comfort of a classic cheese ball, but with a modern, unexpected twist—like adding spicy harissa or smoked paprika—making it a conversation-starting appetizer for gatherings.
A Cheese Ball with a Twist
- This cheese ball is my secret weapon for last-minute snacks—always a hit, always gooey and inviting.
- I love how a simple mixture of cheese and spices can turn into something so nostalgic and celebratory.
- There’s a messy joy in rolling this cheese into a perfect little sphere, especially when everyone gathers around.
- This recipe reminds me of family holidays, where cheesy fingers and laughter were the best parts of the day.
- The moment I unwrap it from the fridge, the aroma of sharp cheddar and spices makes my kitchen feel like home.
A Cheese Ball with a Twist
- This cheese ball recipe was born out of a lazy Sunday craving—something creamy, a little spicy, and perfect for sharing without much fuss. I remember rummaging through my fridge, tossing in whatever cheese and spices I had, and rolling it all together. That first bite was a revelation—smooth, punchy, and oddly nostalgic, like a childhood snack with a grown-up twist.
- Over the years, I’ve tweaked and played with it, trying to keep that imperfect charm alive while making it a bit more special. It’s become my go-to for casual gatherings, where everyone’s fingers get a little messy, and nobody cares. Honestly, it’s that combination of simplicity and surprise that keeps bringing people back to it.
- heading: Short personal story behind this dish
Cheese Ball Trivia & History
- The cheese ball gained popularity in mid-20th century America as a festive party appetizer, often served with crackers or bread.
- Originally, cheese balls were made with simple ingredients like cream cheese, shredded cheese, and nuts, showcasing local dairy produce.
- Some early recipes included ingredients like horseradish or chopped herbs, giving each version a regional or family twist.
- The cheese ball became a symbol of communal holiday gatherings, especially during the 1950s and 1960s, reflecting post-war prosperity and sharing.
- Quirky fact: In the 1970s, cheese balls were also marketed as a healthy snack alternative, despite their cheesy decadence.
Key Ingredients Breakdown
- Cream cheese: I love the silky, tangy base it provides—makes the cheese ball irresistibly smooth. Swap for mascarpone if you want extra richness, but the texture will be slightly softer.
- Shredded cheddar: I prefer sharp cheddar for that punch of flavor and bite. You can use smoked gouda for a smoky twist or a milder cheese if you want less sharpness.
- Spices (paprika, cayenne): These add warmth and color—deep smoky paprika is my favorite, but chili powder works well too for more heat. Adjust to your spice tolerance.
- Nuts (walnuts, pecans): I love the crunch and slight earthiness they add. Toast them beforehand for extra flavor, or skip if you prefer a softer bite.
- Herbs (chives, parsley): Fresh herbs brighten the dish and add a burst of color. Use dried if fresh isn’t available, but chop finely to distribute evenly.
- Optional add-ins (harissa, jalapeños): A dash of harissa or chopped jalapeños can elevate the flavor with a spicy kick—use sparingly if you want it milder.
- Coating (crushed nuts, herbs): Rolling the ball in toasted nuts or chopped herbs gives it a finished look and extra flavor—don’t skip this step for presentation.
Spotlight on key ingredients
Cream cheese:
- I love its silky, tangy smoothness that melts in your mouth—use full-fat for best texture, or swap with mascarpone for extra richness, but keep it chilled to prevent melting.
- It behaves like a sponge during mixing—soften it enough to blend easily, but don’t overheat or it’ll become runny and hard to shape.
Shredded cheddar:
- Sharp cheddar: I prefer a well-aged cheddar for that punch of flavor and slightly crumbly texture—melt it into the mixture while warm for even distribution, or use mild cheese if you want a subtler taste.
- Sharp cheddar: It’s firm and melts smoothly when warm, but can become greasy if overheated—add it gradually and stir well to avoid clumping.
Notes for ingredient swaps
- Dairy-Free: Swap cream cheese for dairy-free cream cheese or mashed avocado—still creamy, but less tangy and a bit earthier.
- Cheddar Cheese: Use smoked gouda or pepper jack for different flavor profiles—think smoky or spicy bites, less sharpness.
- Spices (paprika, cayenne): Substitute with chili powder or smoked paprika for a milder, different smoky or sweet heat.
- Nuts (walnuts, pecans): Toasted sunflower seeds or pumpkin seeds add crunch and earthiness if nuts aren’t available or wanted.
- Herbs (chives, parsley): Basil or cilantro can brighten the flavor with fresh, vibrant notes—chop finely for even distribution.
- Optional add-ins (harissa, jalapeños): Use hot sauce or chopped pickled peppers for a different spicy kick—less intense, more tang.
- Coating (crushed nuts, herbs): Crushed crackers or pretzels work well for a crunchy exterior if nuts aren’t your thing.
Equipment & Tools
- Mixing bowl: To combine and mix the cheese and spices.
- Spatula: To stir and incorporate ingredients thoroughly.
- Rubber gloves: To shape the cheese ball without sticking.
- Baking sheet: To hold the cheese ball during chilling and coating.
- Parchment paper: To prevent sticking and make cleanup easier.
- Small plate: For rolling the coated cheese ball.
Step-by-step guide to cheese ball
- Gather all equipment: mixing bowl, spatula, rubber gloves, baking sheet, parchment paper, and a small plate for rolling.
- In a large mixing bowl, soften 8 oz of cream cheese in the microwave for about 20 seconds until slightly warm and pliable.
- Add 1 cup shredded sharp cheddar, 1 teaspoon smoked paprika, 1/2 teaspoon cayenne, and a pinch of salt. Mix thoroughly until smooth and well combined.
- Stir in 2 tablespoons chopped fresh herbs like chives or parsley, and 1 tablespoon of chopped toasted nuts if using.
- Taste the mixture and adjust spices if needed—more paprika for smoky flavor or cayenne for heat. It should smell savory with a hint of spice.
- Using clean hands or gloves, scoop out the cheese mixture and form it into a tight ball, about 4 inches in diameter. Keep it firm but smooth.
- Place the cheese ball on a parchment-lined baking sheet. Cover loosely with plastic wrap and refrigerate for at least 1 hour to firm up.
- While the cheese ball chills, prepare your coating: crush additional nuts or chop herbs if desired.
- Once chilled, roll the cheese ball in the coating mixture, pressing gently to adhere. Shake off excess and place on a serving platter.
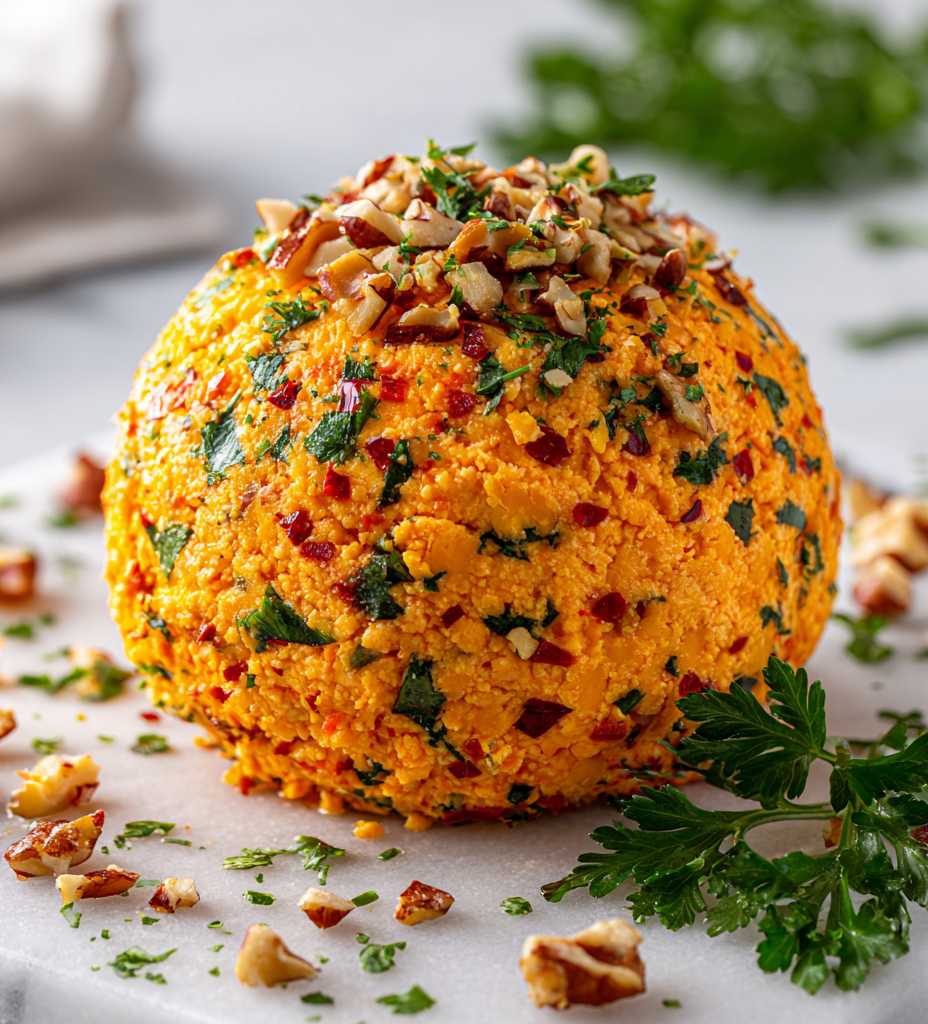
- Optional: Garnish with a sprinkle of paprika or chopped herbs for extra color and aroma. Serve with crackers or sliced baguette.
Refrigerate the cheese ball covered for at least an hour. Serve chilled or at room temperature, garnished with herbs or extra spices for visual appeal.
How to Know It’s Done
- Cheese mixture is well combined and smooth before forming.
- Cheese ball is firm and holds shape after chilling.
- Outer coating adheres evenly and looks inviting with vibrant color.
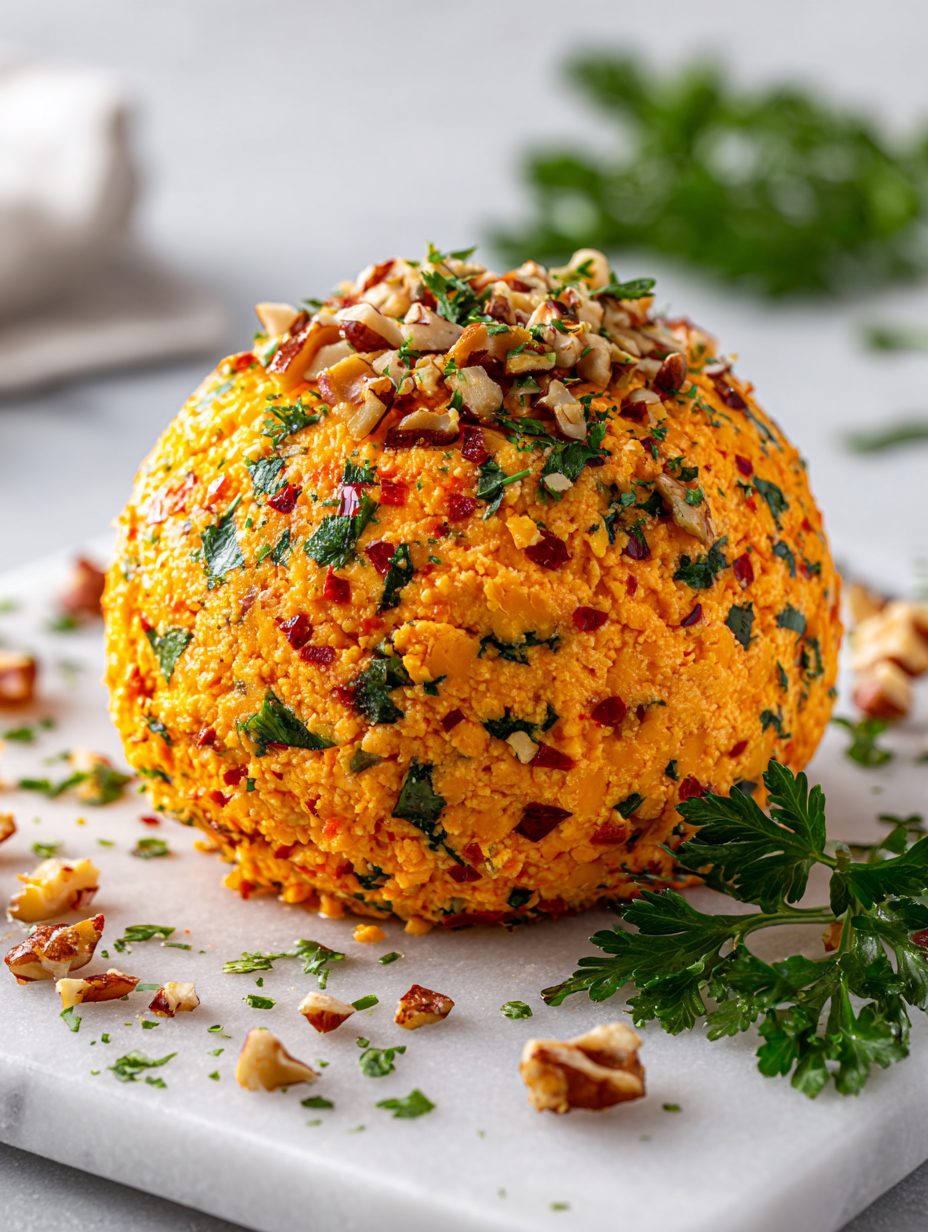
Spicy Cheddar Cheese Ball with Nuts and Herbs
Ingredients
Equipment
Method
- In a mixing bowl, soften the cream cheese until it's smooth and pliable, about 20 seconds in the microwave.
- Add the shredded sharp cheddar, smoked paprika, cayenne pepper, and a pinch of salt to the bowl. Use a spatula to mix everything thoroughly until the mixture is creamy, uniform, and slightly fragrant.
- Stir in the chopped fresh herbs and toasted nuts, folding gently to distribute the flavors evenly throughout the mixture.
- Taste the mixture and adjust the spices if needed—add more paprika for smokiness or cayenne for heat. Once satisfied, scoop the mixture out and shape it into a tight, smooth ball about 4 inches in diameter, pressing gently with your hands or gloves.
- Place the cheese ball on a parchment-lined baking sheet. Cover loosely with plastic wrap and refrigerate for at least 1 hour to firm up and meld the flavors.
- While the cheese ball chills, prepare your coating mixture by crushing additional toasted nuts or chopping fresh herbs if desired. This step adds texture and visual appeal.
- Once chilled, remove the cheese ball from the fridge. Roll it in the coating mixture, pressing gently to ensure the exterior adheres evenly. Shake off any excess for a clean finish.
- Place the coated cheese ball on a serving platter and garnish with a sprinkle of paprika or chopped herbs for extra color. Serve with crackers, sliced baguette, or vegetable sticks.
Tips & Tricks for Perfect Cheese Ball
- Bolded mini-head: Chill your cheese mixture thoroughly—this helps it stay firm and easier to shape.
- Bolded mini-head: Use fresh herbs—dried herbs can be overpowering and lose their bright flavor when mixed in.
- Bolded mini-head: Toast nuts before rolling—this amplifies their crunch and nutty aroma, adding depth.
- Bolded mini-head: Incorporate spices gradually—start with less, taste, then add more for balanced heat and flavor.
- Bolded mini-head: Handle the cheese ball gently when coating—press slightly to ensure the exterior sticks without cracking.
- Bolded mini-head: Serve at room temperature—removes the chill bitterness and enhances the creamy, cheesy taste.
- Bolded mini-head: For a smoother finish, soften the cheese slightly before mixing—just warm enough to blend easily.
Common mistakes and how to fix them
- FORGOT to measure ingredients precisely? Use a scale for accuracy, especially with cheese and spices.
- DUMPED all nuts at once? Toast them separately for better flavor and crunch, then cool before rolling.
- OVER-TORCHED the cheese mixture? Lower heat immediately and stir to prevent burning and bitterness.
- SKIPPED chilling time? Ensure at least 1 hour in fridge for firm shaping and better flavor melding.
Quick Fixes & Pantry Swaps
- If cheese mixture is too soft, chill for 15 minutes before shaping.
- When nuts are missing, use crushed pretzels for crunch and saltiness.
- Splash a little lemon juice if cheese feels greasy or lacks tang.
- Patch cracks by gently pressing the coating back into place quickly.
- Shield the cheese ball with plastic wrap if it starts to dry out in fridge.
Prep, store, and reheat tips
- You can prepare the cheese mixture a day in advance; keep it tightly covered in the fridge to prevent drying out. The flavors meld beautifully overnight, making it even more flavorful.
- Shape the cheese ball and roll it in your chosen coating up to 24 hours ahead; store it covered in the fridge. The exterior firms up slightly, which helps it hold its shape better when served.
- The cheese ball is best enjoyed within 2 days of making. After that, the texture might soften too much, and flavors may mellow—best fresh for that punch of spice and richness.
- Reheat by letting it sit at room temperature for about 15-20 minutes before serving. The interior will soften slightly, and the flavors will become more pronounced with a warm, cheesy aroma filling the room.
Top questions about cheese balls
1. How do I prevent the cheese from cracking?
Use softened cream cheese and shredded cheese, mix well until smooth, then chill before shaping.
2. Can I make the cheese ball ahead of time?
Chill the shaped cheese ball for at least an hour. This firms it up and makes coating easier.
3. How long can I store a cheese ball?
Yes, keep it covered in the fridge for up to 2 days. Bring to room temp before serving for best flavor.
4. What nuts work best for coating?
Use crunchy nuts like walnuts or pecans, toasted first for extra flavor and crunch.
5. How spicy can I make it?
Adjust spices like paprika or cayenne to your heat preference. Start small and taste as you go.
6. Can I substitute dried herbs?
Use fresh herbs like chives or parsley for brightness. Dried herbs can work but may be less vibrant.
7. How do I shape the cheese ball without it falling apart?
Form the cheese mixture into a tight ball with gloves or damp hands to prevent sticking.
8. Should I serve the cheese ball cold or at room temp?
Serve at room temperature for optimal creaminess and flavor. Take out about 30 minutes before serving.
9. What if my cheese mixture is too greasy?
Add a splash of lemon juice if cheese feels greasy or lacks brightness to balance flavors.
10. How can I customize the flavor?
For a smoky flavor, add smoked paprika or chipotle powder. For heat, include chopped jalapeños.
This cheese ball isn’t just about nostalgia; it’s about the messy, affectionate moments of sharing good food with friends and family. The way the aroma of melted cheese mingles with spices, and how everyone digs in with fingers sticky from the creamy bites—those are the real wins.
In a world that’s always rushing, this simple, imperfect dish reminds me to slow down and enjoy the small, cheesy joys. It’s a little ball of comfort that feels like an old friend, always ready to bring people together around the table.

Hi there! I’m Isabella, the founder and curious foodie behind Crumb Detective. I’ve always believed that every dish has a story to tell — from the secret family recipes passed down through generations to the bold experiments happening in kitchens around the world.