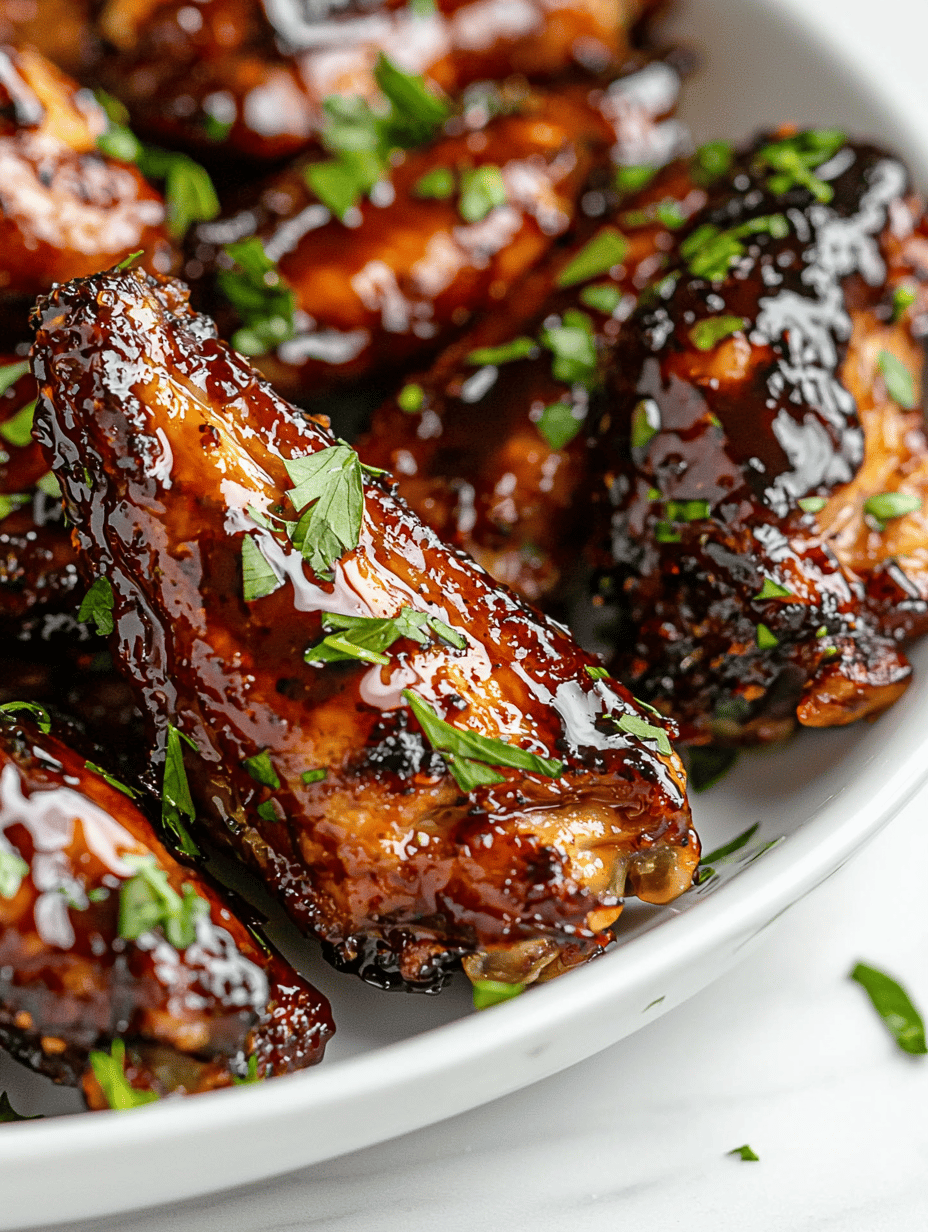

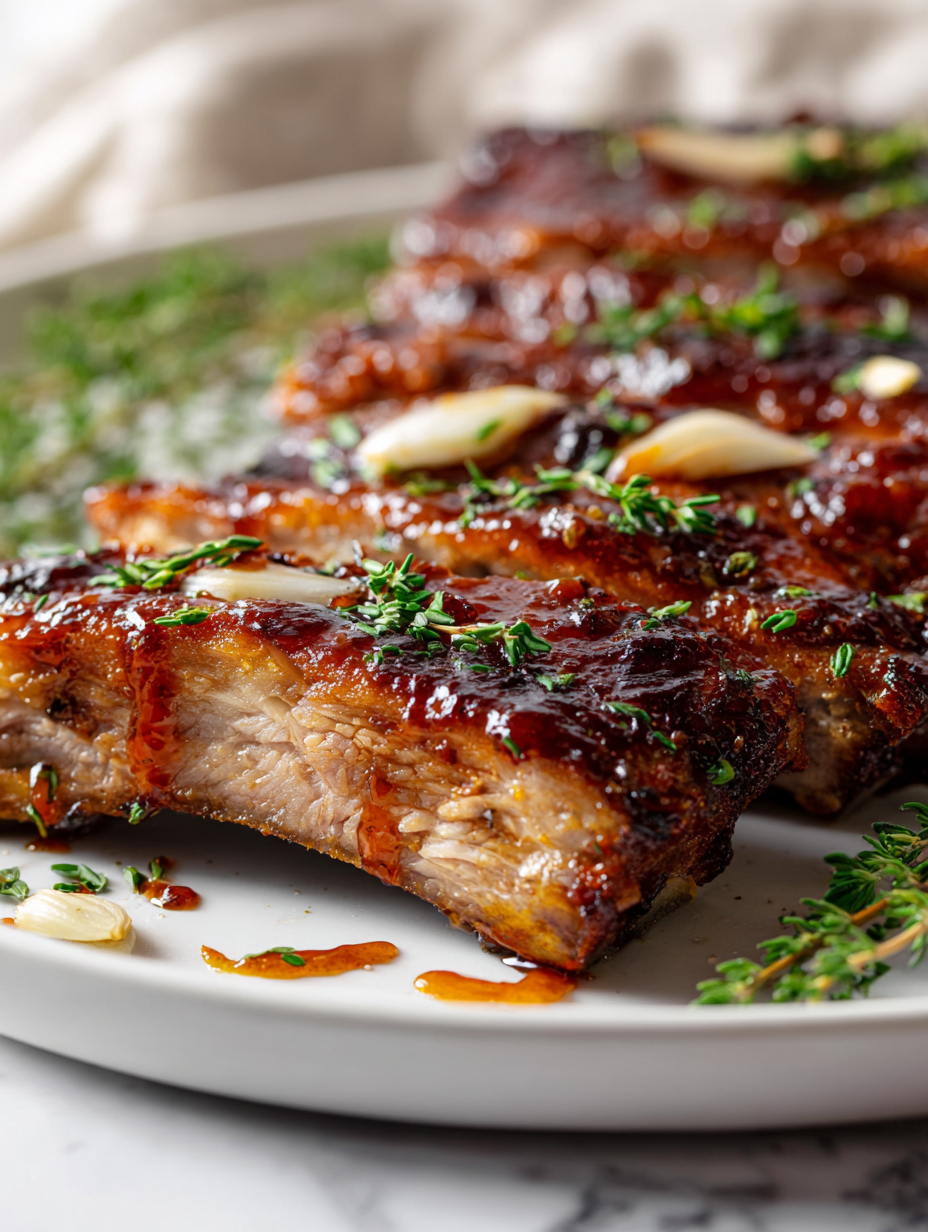
Cooking ribs has always been a bit of a ritual for me, but I never truly appreciated the magic of that sticky glaze until I started slow roasting them. It’s a process that demands patience, but the payoff is worth every minute—tender meat coated in a caramelized, smoky-sweet crust that clings with every bite. This recipe is my way of turning casual weekend cookouts into something a little more special, a messy, flavorful celebration.
What draws me to this particular approach is how the sugar and sauce transform during slow roasting, creating that irresistible sticky layer. I love the way the aroma fills the kitchen—sweet, smoky, a little tangy—and how everyone leans in as I unwrap the foil. It’s not just about eating ribs; it’s about the anticipation, the slow build-up of flavor, and the joy of pulling apart tender meat that’s been kissed by heat and glaze alike.
Focusing on the sticky, caramelized glaze that develops during slow roasting, I see this dish as a testament to patience and attention to detail. It’s about coaxing out the pork’s natural sweetness and building layers of flavor that cling and shine with every bite. This isn’t just ribs; it’s an experience of texture and aroma, a messy, satisfying ritual that transforms simple pork into something memorable.
The secret to that caramelized crust
- I love how sticky, sweet, and smoky these ribs turn out—it’s like biting into a caramelized dream.
- There’s a chaos in the kitchen when I’m glazing, but seeing that glossy coat form makes every second worth it.
- Nothing beats the primal satisfaction of pulling apart tender meat that’s been kissed by heat and glaze.
- This dish reminds me of summer cookouts, but honestly, I make it in winter just to get that warm, sticky mess.
- Watching the glaze caramelize and crackle in the oven is oddly calming—like a slow, smoky dance.
The inspiration behind this dish
- This recipe came from a lazy Sunday craving for something deeply savory and just a little messy. I remember the first time I tried to make ribs, I was overwhelmed by the sticky, caramelized glaze that seemed impossible to perfect. Over time, I realized that patience and a slow roast transform simple pork into something almost addictive, with a crust that crackles and a meat so tender it falls apart at the touch. It’s not fancy, but it’s honest work—messy, satisfying, and worth every minute.
- I love how the glaze develops during that slow cook, creating a thick, glossy coat that clings and shimmers. There’s a certain thrill in watching the sugar and sauce caramelize, filling the kitchen with smoky, sweet aromas. It’s one of those dishes that feels like a ritual—waiting, glazing, tasting—and each step feels like an act of love. These ribs remind me of backyard barbecues, but honestly, I make them in my tiny apartment oven just to chase that nostalgic, sticky goodness.
- The real magic is in the patience—waiting for the slow simmer and caramelization to do their thing. It’s about coaxing out the pork’s natural sweetness and turning simple ingredients into a messy, flavorful masterpiece. Every time I make this, I’m reminded that good things take time, especially when it comes to building layers of flavor that cling with every bite.
Trivia and Historical Tidbits
- Sticky pork ribs have roots in both Southern barbecue traditions and Asian glazed styles, blending smoky and sweet flavors.
- Historically, ribs were considered a humble cut, slow-cooked to tender perfection to maximize flavor and texture.
- The caramelized glaze technique likely evolved from sugar-rich sauces used in Asian cuisines, adapted by Western pitmasters.
Ingredient breakdown: key components
- Pork ribs: I prefer bone-in for that rich, juicy bite, but boneless works if you’re after easier eating—just expect a different texture.
- Sugar: Brown sugar adds depth and that irresistible caramel flavor. Skip it for a less sticky, slightly less smoky crust.
- Soy sauce: It gives the glaze a savory umami kick and helps the sauce cling. Tamari makes a good gluten-free swap, but it’s milder.
- Honey: I love how it boosts the glaze’s shine and stickiness, plus a subtle floral sweetness. Maple syrup can be a smoky alternative.
- Garlic: Fresh garlic is key for that pungent, aromatic punch. Dried garlic powder is okay if you’re short on time, but less vibrant.
- Apple cider vinegar: It cuts through the sweetness with a bright, tangy note. Lemon juice is a lively substitute, adding zesty freshness.
- Five-spice powder: Just a pinch adds an unexpected warm, aromatic layer—skip if you prefer a more straightforward smoky-sweet flavor.
Spotlight on key ingredients
Pork Ribs:
- I prefer bone-in for that rich, juicy bite, but boneless works if you’re after easier eating—just expect a different texture.
- Sugar: Brown sugar adds depth and that irresistible caramel flavor. Skip it for a less sticky, slightly less smoky crust.
- Soy sauce: It gives the glaze a savory umami kick and helps the sauce cling. Tamari makes a good gluten-free swap, but it’s milder.
Honey & Garlic:
- Honey: I love how it boosts the glaze’s shine and stickiness, plus a subtle floral sweetness. Maple syrup can be a smoky alternative.
- Garlic: Fresh garlic is key for that pungent, aromatic punch. Dried garlic powder is okay if you’re short on time, but less vibrant.
Notes for ingredient swaps
- Dairy-Free: Swap honey for agave syrup to keep that sticky sweetness without dairy notes, but expect a slightly different floral tone.
- Lower Sugar: Replace brown sugar with coconut sugar for a caramel-like flavor, though it might be a tad less glossy.
- Gluten-Free: Use tamari instead of soy sauce for the same umami punch, but note it’s a bit milder and darker.
- Vinegar Alternatives: Lemon juice can brighten the glaze with a zesty kick, replacing apple cider vinegar with a fresher tang.
- Sweetener Swap: Maple syrup can substitute honey for a smoky, robust sweetness with a hint of caramel, but it’s slightly thinner.
- Pork Options: If pork ribs aren’t available, try using pork shoulder cut into ribs—less traditional, but still flavorful.
- Spice Level: Add a pinch of chili flakes or smoked paprika to amp up the smoky heat or keep it milder as is.
Equipment & Tools
- Baking sheet: To hold the ribs during roasting
- Aluminum foil: To seal in moisture and create a tender, slow-cooked environment
- Pastry brush: To apply the glaze evenly
- Small saucepan: To simmer and thicken the glaze
- Oven thermometer (optional): To ensure accurate roasting temperature
Step-by-step guide to sticky ribs
- Preheat your oven to 150°C (300°F). Gather a large baking sheet, foil, a brush, and a small saucepan.
- Prepare the ribs: remove the silver skin if still attached, then cut into manageable sections if needed. Pat dry.
- Mix your glaze: combine brown sugar, soy sauce, honey, minced garlic, apple cider vinegar, and five-spice in a saucepan. Bring to a simmer over medium heat, about 3-5 minutes, until thickened and glossy.
- Brush a generous layer of glaze onto the ribs, ensuring all sides are coated. Wrap tightly in foil, sealing well.
- Place the foil-wrapped ribs on the baking sheet. Roast in the oven for 2.5–3 hours, until meat is tender and pulls away easily.
- Remove from oven, carefully unwrap the foil, and brush with another layer of glaze. Increase oven temperature to 220°C (430°F).
- Return the ribs, uncovered, to the oven. Bake for an additional 15–20 minutes, until the glaze is bubbling and caramelized, crackling at the edges.
- Check the ribs: the meat should be falling apart, with a dark, sticky crust. If the glaze isn’t bubbling, give them another few minutes.
- Let the ribs rest for 5 minutes outside the oven. Slice or serve whole, drizzled with any remaining glaze for extra stickiness.
Let the ribs rest for 5 minutes, uncovered, to allow the glaze to set. Serve directly from the bone or sliced, with extra glaze drizzled over for added stickiness.
How to Know It’s Done
- Meat pulls away easily from the bone, with a deep caramelized crust.
- Glaze is thick, glossy, and bubbling at the edges, with a smoky-sweet aroma.
- Surface crackles slightly when pressed, indicating caramelization is complete.
Sticky Slow-Roasted Pork Ribs
Ingredients
Equipment
Method
- Preheat your oven to 150°C (300°F). Prepare a large baking sheet and lay out a piece of aluminum foil for wrapping the ribs later.
- Remove the silver skin from the ribs if present, then cut the racks into manageable sections for easier handling. Pat them dry with paper towels to remove excess moisture.
- In a small saucepan, combine brown sugar, soy sauce, honey, minced garlic, apple cider vinegar, and five-spice powder. Bring the mixture to a simmer over medium heat, stirring constantly until it thickens slightly and becomes glossy—about 3 to 5 minutes. This creates your flavorful glaze.
- Use a pastry brush to generously coat all sides of the ribs with the glaze, ensuring an even, sticky layer. Place the coated ribs on the prepared baking sheet.
- Wrap the ribs tightly in the aluminum foil, sealing well to trap moisture and promote tenderization during slow roasting.
- Place the wrapped ribs in the oven and roast for about 2.5 to 3 hours, or until the meat is tender and pulls away easily from the bone. The kitchen will fill with a rich, smoky aroma as the sugars caramelize slowly.
- Carefully remove the foil-wrapped ribs from the oven. Unwrap the foil to reveal the tender meat and sticky glaze underneath. Brush the ribs again with a little extra glaze for added flavor and shine.
- Increase the oven temperature to 220°C (430°F). Return the ribs, uncovered, to the oven and roast for an additional 15 to 20 minutes. During this time, the glaze will bubble and crackle, forming a glossy, caramelized crust.
- Once the glaze is bubbling and crackling, and the crust is deep golden, remove the ribs from the oven. Let them rest for about 5 minutes to allow the glaze to set and juices to redistribute.
- Slice the ribs or serve them whole, with the sticky glaze clinging to the meat. Enjoy the tender, caramelized, smoky-sweet goodness with your favorite sides.
Notes
Pro tips for sticky ribs
- Bold the surface: Use a high heat to develop a thick, crackling glaze—don’t shy away from that smoky crackle.
- Layer flavors: Brush on multiple coats of glaze during roasting to build a sticky, intense crust that clings to every bite.
- Control caramelization: Keep a close eye when glazing the final minutes—if it darkens too fast, loosely cover with foil to prevent burning.
- Test tenderness: Probe the ribs with a toothpick or skewer after slow roasting; it should slide in easily with little resistance.
- Don’t skip resting: Let the ribs rest uncovered for 5 minutes outside the oven—this helps the glaze set and keeps the meat juicy.
- Use oven fan: If your oven has a convection setting, turn it on during the final blast to enhance crisping and caramelization.
- Keep the sauce thick: Simmer the glaze until it’s thick enough to coat the back of a spoon—this ensures a glossy, stickable finish.
Common mistakes and how to fix them
- FORGOT to adjust oven temperature → Use a thermometer for precise heat control.
- DUMPED sauce too early → Wait until glaze is bubbling and caramelized before glazing again.
- OVER-TORCHED the ribs → Cover with foil if flames or excessive browning occurs.
- MISSED resting time → Rest meat 5 minutes for juices to settle, preventing dryness.
Quick fixes and pantry swaps
- If sauce is too thin, splash in a bit more soy and simmer until thickened.
- When ribs are too dry, patch with extra glaze during reheating.
- Splash water if glaze burns; shield with foil and continue roasting.
- DUMPED sauce too late? Rescue with a quick brush of fresh glaze at the end.
- When glaze shimmers and crackles, it’s ready—don’t rush the caramelization process.
Prep, store, and reheat tips
- Prep the glaze ingredients—mix and simmer until thickened—done a day ahead to deepen flavors and save time.
- Refrigerate cooked ribs, tightly wrapped in foil or in an airtight container, for up to 3 days; reheat to revive that sticky crust.
- Allow ribs to come to room temperature before reheating to ensure even warmth and maintain tenderness.
- Reheat in a low oven (around 150°C/300°F) covered with foil for about 20 minutes, until warmed through and glaze is slightly bubbling.
- The flavors will deepen after resting overnight, but the glaze may lose some of its initial shine—reapply a quick brush of glaze during reheating for maximum stickiness.
Top questions about sticky pork ribs
1. How do I choose the best pork ribs?
Look for ribs with a good marbling of fat; it keeps the meat juicy and adds flavor. Bone-in ribs tend to be more tender and flavorful. Avoid overly lean cuts if you want that melt-in-your-mouth texture.
2. What temperature is best for slow roasting ribs?
Cooking at 150°C (300°F) for a slow roast allows the collagen to break down, making the ribs tender and easy to pull apart. Don’t rush the process—patience is key for that sticky, caramelized crust.
3. How do I get a shiny, sticky glaze?
Use a basting brush to apply the glaze evenly. During the final high-heat stage, brush multiple layers to build up that glossy, crackling coating. Keep an eye to prevent burning—glaze should bubble and shimmer, not blacken.
4. Should I wrap the ribs during cooking?
Wrap the ribs tightly in foil after the initial slow cook to trap moisture. For extra tenderness, you can leave the foil on for the first 2 hours, then uncover for the last 30 minutes to caramelize the glaze.
5. How long should I rest the ribs?
Rest the ribs for about 5 minutes after removing from the oven. This allows the juices to redistribute and the glaze to set, giving you that perfect sticky, tender bite. Don’t skip this step.
6. How do I thicken or thin the glaze?
If the glaze isn’t thick enough, simmer it longer until it coats the back of a spoon. If it’s too thick or sticky, add a splash of water or vinegar to loosen it before glazing.
7. What internal temperature indicates doneness?
Use a thermometer to check the internal temperature of the meat, aiming for around 90°C (194°F). The meat should be tender enough to pull apart easily but not dry or falling off the bone.
8. How long should I finish the ribs at high heat?
Letting the ribs caramelize at high heat for 15–20 minutes is crucial. Watch closely during this stage—look for crackling edges and a deep, glossy sheen that indicates perfect caramelization.
9. How do I store and reheat leftover ribs?
Store leftovers in an airtight container in the fridge for up to 3 days. Reheat gently in a low oven covered with foil, about 20 minutes, until hot and sticky again. Add a fresh layer of glaze if needed.
10. What if the glaze starts to burn?
If you notice the glaze burning, cover the ribs loosely with foil and lower the oven temperature slightly. Splashing a little water or vinegar can also help prevent sticking and scorching during reheating.
Making these sticky pork ribs is more than just a weekend project; it’s a small act of patience and care that pays off in every sticky, smoky bite. The process of slow roasting and caramelizing might take some time, but it’s honestly worth each minute of waiting. Once you crack open that crust and see the meat fall apart, you’ll know exactly why this dish sticks with you.
In the end, it’s not just about the flavor, but the ritual of preparing something that demands attention. These ribs remind me that good things come through slow work and a little chaos—messy, tender, and deeply satisfying. And when the aroma fills the kitchen, it’s hard not to smile, knowing you’ve created something truly memorable.

Hi there! I’m Isabella, the founder and curious foodie behind Crumb Detective. I’ve always believed that every dish has a story to tell — from the secret family recipes passed down through generations to the bold experiments happening in kitchens around the world.